Documentation
Learn how to use Covenant Match to find the perfect teammates for your gaming sessions.
Table of Contents
Creating a New Session

Create New Session interface (click to enlarge)
Session Details
Session Name
Enter a descriptive name for your session. This will be displayed in the session list on the covenant match page, making it easier for other players to find your session.
In-Game Password
Create a unique password that your team will need to configure on their gaming platform. This ensures that you will match with players who have the same password on their platform.
Session Type
Choose whether your session is regular (visible to all players), friends only (only visible to players on your friends list), or private (only visible to you - you can share the session link with others).
Character Selection
Select Nightfarer
Choose your Nightfarer which will also be displayed to other players, before they join your session.
Select Night Lord
Choose which Night Lord you want to take on in your session. This will be displayed on the session details for other players to see.
Creating Your Session
After filling in all the details, click the “Create Session” button. Your session will be created and you will be redirected to your session screen where you can:
- Track session progress
- Chat with team members
- Invite friends to join
Managing Your Session
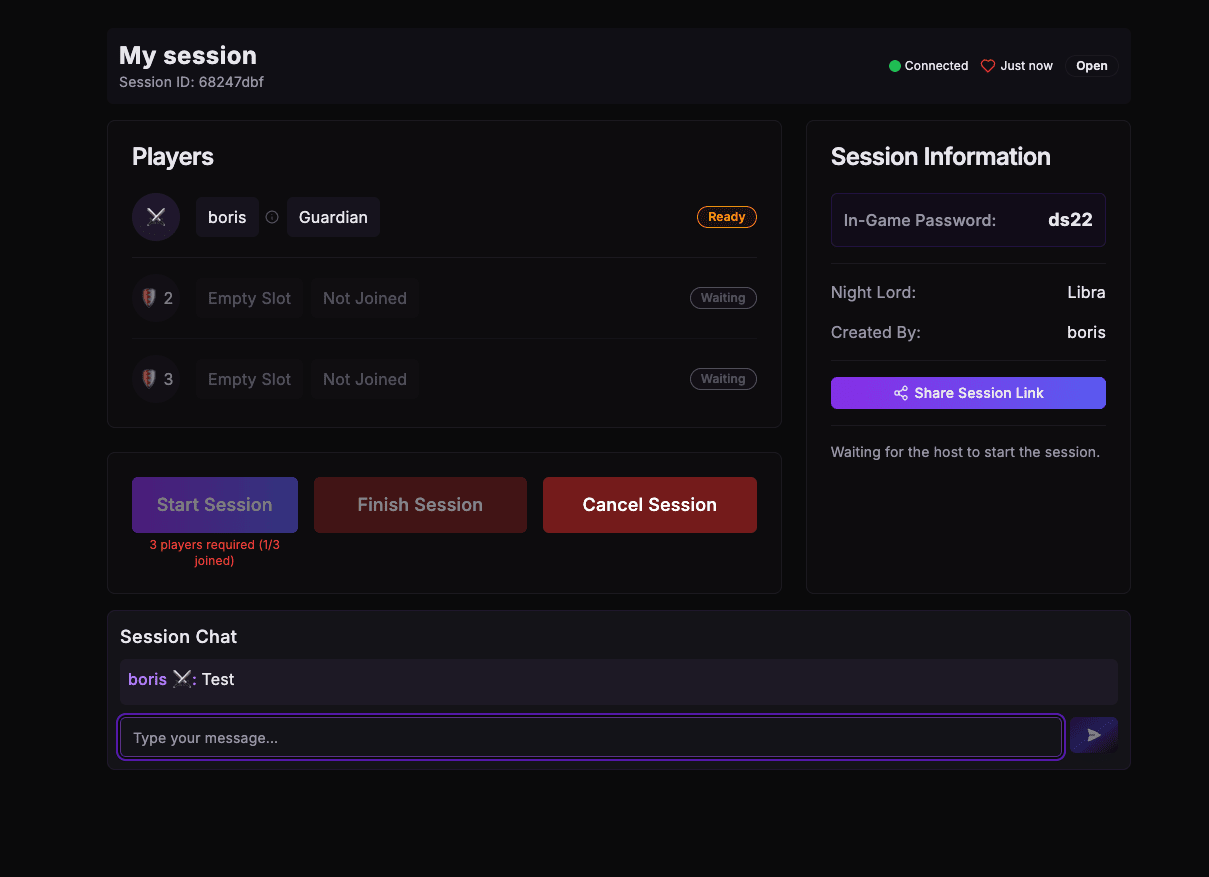
Session management interface (click to enlarge)
Session Overview
Players Panel
The left panel shows all players in your session. As the host, you can see who has joined, their character selection, and their ready status. Empty slots show as “Not Joined” until players join your session.
Session Information
The right panel displays key session details including:
- In-Game Password - needed to be configured on the gaming platform
- Night Lord - the boss your team will take on
- Session creator information
- Share Session Link button to invite others
Session Chat
The built-in chat system at the bottom lets you communicate with other players in your session. Use this to quickly coordinate strategies, discuss game plans, or just get to know your teammates before starting the session.
Session Controls
As the host, you have access to several controls:
- Start Session - Begin the session once enough players have joined
- Finish Session - End a session after completion
- Cancel Session - Terminate the session before it begins
Note that you need a minimum of 3 players to start a session, as indicated by the player counter.
Active Session
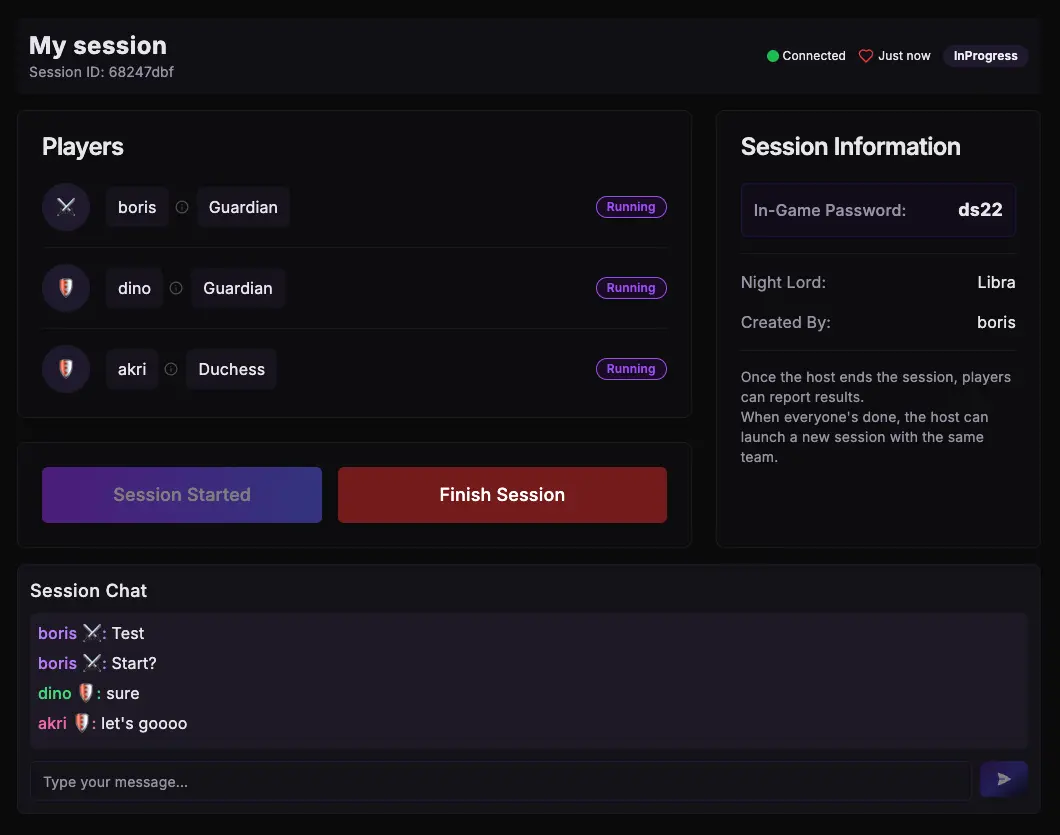
Active session interface (click to enlarge)
During an Active session
Session Started State
When a host starts a session, you'll notice several changes in the interface:
- The status indicator at the top shows “InProgress”
- Each player's status changes from “Ready” to “Running”
- The “Start Session” button is replaced with “Session Started” indicator
- Only the “Finish Session” option remains available for the host
Session Information Updates
The session information panel updates to provide guidance on what happens next:
- Instructions for reporting results when the session ends
- Information about continuing with the same team after completion
This information helps you understand the next steps in the session lifecycle and ensures you know how to properly conclude your session.
Communication During the session
During an active session, the chat system becomes even more important:
- Coordinate your session strategy with team members
- Share information about boss locations and attack patterns
- Notify others if you encounter issues
- Build camaraderie with your team through the shared experience
Finishing the Session
When your session is complete, the host should:
- Click the “Finish Session” button
- Confirm the action in the dialog that appears
- Proceed to report the results of your session
Only the host can finish a session. Players will receive a notification when the session is ended and will be prompted to report their perspective on the results.
Confirmation Dialog
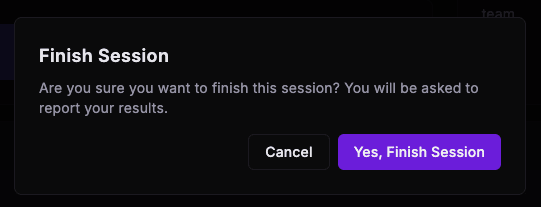
Session finish confirmation dialog
When host clicks the “Finish Session” button, host will be prompted with a confirmation dialog:
- The dialog reminds you that you'll need to report results after finishing
- You can choose “Yes, Finish Session” to confirm
- You can select “Cancel” if you clicked the button by mistake
This confirmation step helps prevent accidental session endings and ensures everyone is ready to move to the reporting phase.
Reporting Session Results

Session result reporting interface (click to enlarge)
Submitting session Results
After Session Completion
When a session is completed, the interface changes to allow all players to report the outcome. You'll notice:
- The status indicator at the top shows “Completed”
- All players show “Finished” status
- The result reporting panel appears on the right side
- Each player must report their results individually (“Result Pending” indicators)
Reporting Options
The result reporting interface provides three outcome options:
- WIN - Your team successfully defeated the Night Lord
- LOSS - Your team was defeated
- D/C - Disconnected (use only if technical issues prevented completion)
Select the outcome that best represents what happened during your session. Be honest with your reporting to maintain accurate statistics. The reward for reporting each session is players dashboard with all the detailed statistics.
Session Rating
After selecting an outcome, you can rate your experience with the team:
- Rating is done on a 1-5 star scale
- Consider factors like teamwork, communication, and overall enjoyment
- Your ratings help improve matchmaking quality for future sessions
- Rating is optional, but it is a great way to give feedback to your team
Submitting Your Report
Once you've selected an outcome and rating:
- Click the “Submit Results” button
- Your status will change from “Result Pending” to “Reported”
- Wait for other team members to submit their reports
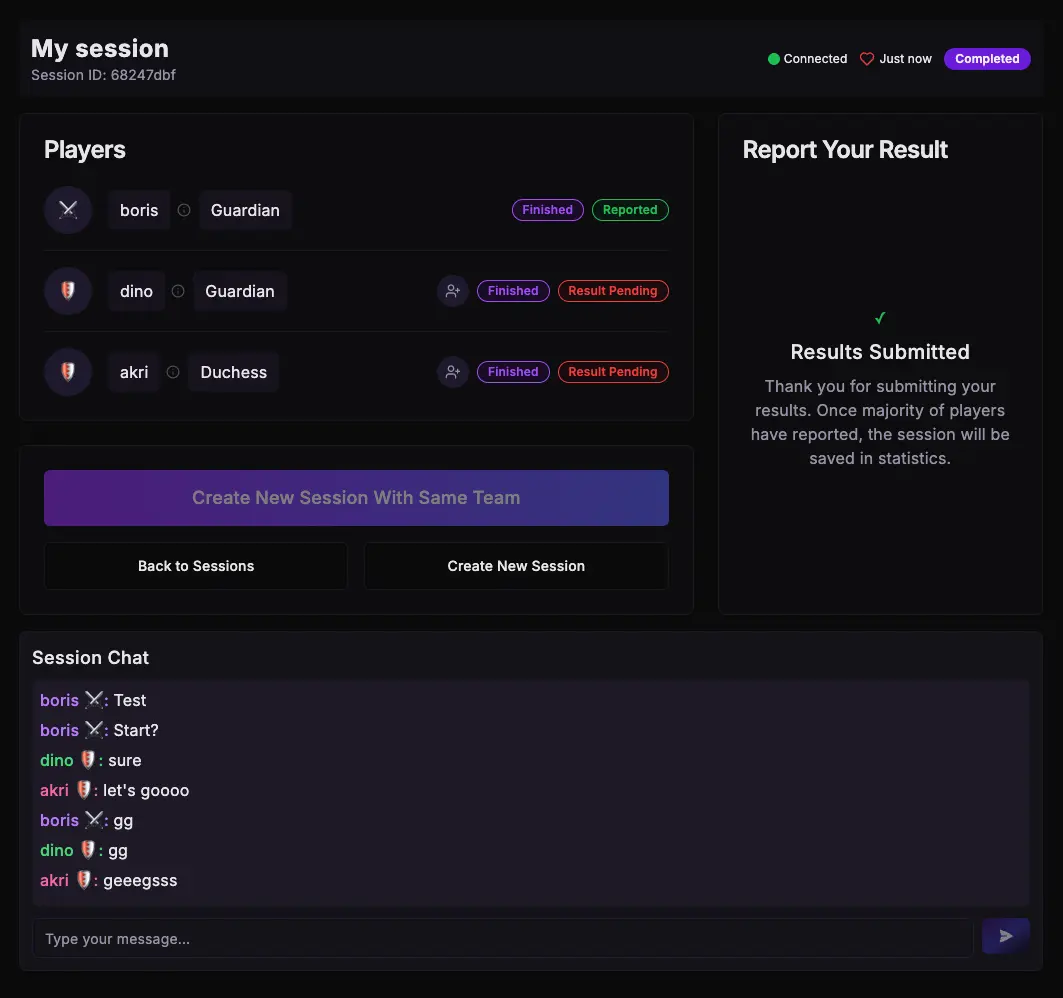
Results submitted confirmation (click to enlarge)
After Reporting
Results Confirmation
After submitting your results:
- The reporting panel changes to a confirmation message
- You'll see a “Results Submitted” notification
- Your player status shows “Reported” instead of “Result Pending”
Session Statistics
Once the majority of players have reported their results:
- The session outcome is determined by consensus
- Results are saved in your player statistics
- Your win/loss record and win rate percentage are updated
- Session history is recorded in your profile
Starting a New Session
After reporting, you have several options:
- Create New Session With Same Team - Start a fresh session with the current players
- Back to Sessions - Return to the sessions list to browse other available sessions
- Create New Session - Start a completely new session with different settings
If you enjoyed playing with your team, consider using the “Create New Session With Same Team” option for a seamless transition to another session. Keep in mind that this option will be available only if all players have reported their results.
Adding Friends From Your Session
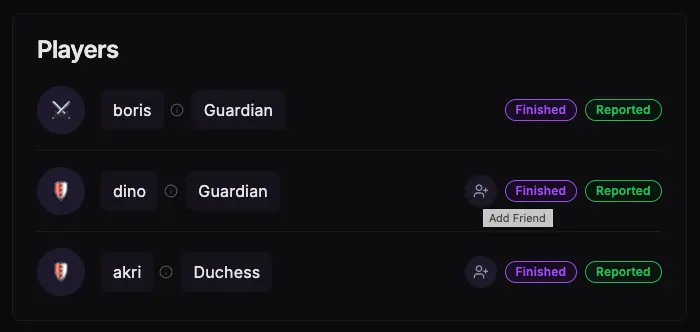
Add friend interface in a completed session
One of the most important features becomes available after a session is completed: the ability to add players from your session to your friends list.
- Look for the “Add Friend” button that appears next to players' names
- Click the button to send them a friend request
- Once accepted, these players will appear in your friends list for easier future collaboration
- You can only send friend requests to players who aren't already your friends
This feature is crucial for building a network of skilled players that you enjoy gaming with. After completing a session, take a moment to add players who were good teammates, communicated well, or whose playstyle complemented yours.
Managing Players
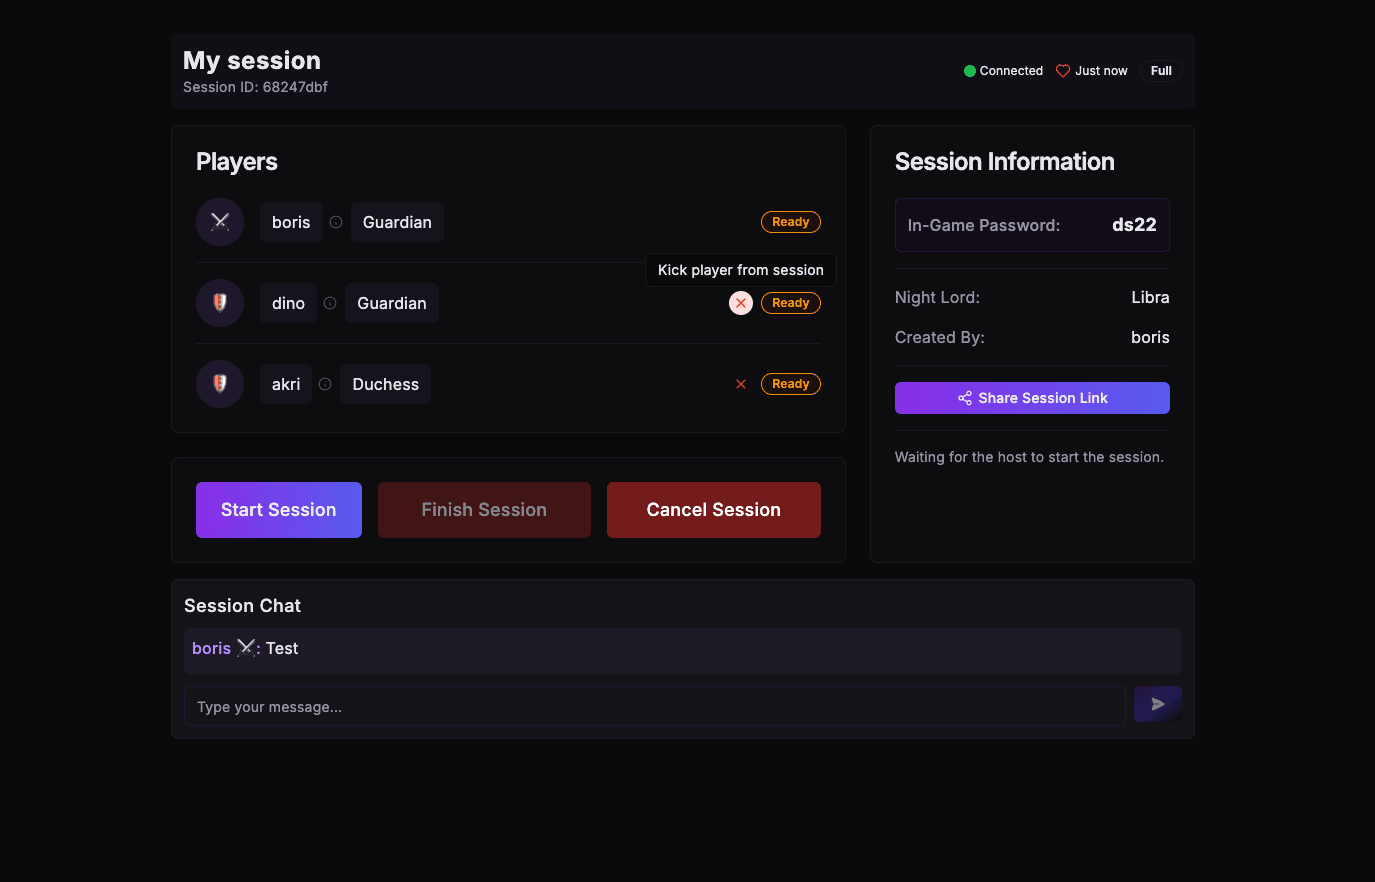
Player management interface (click to enlarge)
Removing Players from Your Session
When to Remove Players
As a session host, you have the power to remove players from your session. This may be necessary when:
- A player is inactive or AFK (away from keyboard)
- Someone is being disruptive in the chat
- You need to make room for a friend to join
How to Kick a Player
To remove a player from your session:
- Locate the player in the Players panel
- Look for the “Kick player from session” button (red X) that appears on the other side of player's name, next to the status indicator
- Click the button to remove them
- Confirm your decision when prompted
The player will receive a notification that they have been removed from the session, and their slot will become available for another player to join.
Player Management Best Practices
To maintain a positive gaming community:
- Send a message in chat before kicking someone, explaining why
- Give players a chance to respond before removing them for inactivity
Viewing Player Statistics
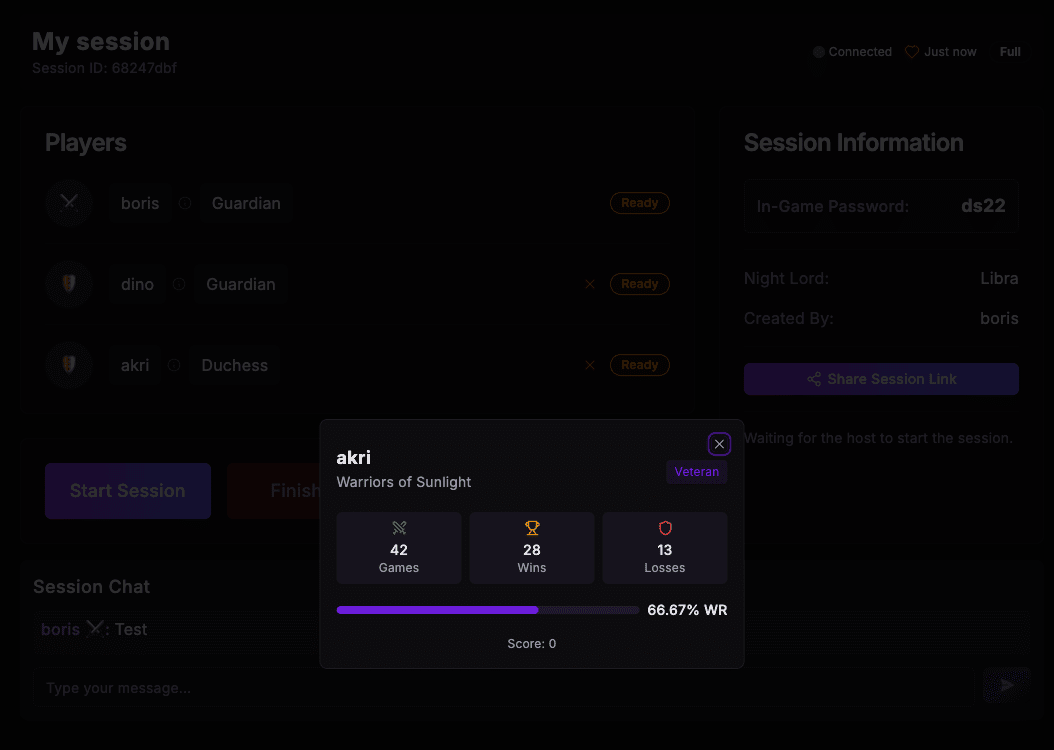
Player statistics interface (click to enlarge)
Understanding Player Performance
Player Profile Access
During a session, you can view detailed statistics for any player by clicking on their name in the Players panel. This opens a statistics overlay showing their performance history and current status.
Stats Overview
The player statistics card displays important information:
- Covenant Affiliation - Which faction the player belongs to
- Experience Level - Indicated by labels like “Veteran”
- Games Played - Total number of sessions played
- Win/Loss Record - The player's success ratio
- Win Rate (WR) - Percentage of games won with progress bar
- Score - Overall performance rating in the game
Using Stats Effectively
Player statistics can help you:
- Identify experienced players who might take leadership roles
- Balance your team by including players with different skill levels
- Build trust with new players by showing your own experience
- Recognize skilled players you might want to add as friends for future sessions
Remember that statistics are just one part of the player experience. They don't always reflect a player's ability to communicate well or work as part of a team.
Your Game Dashboard
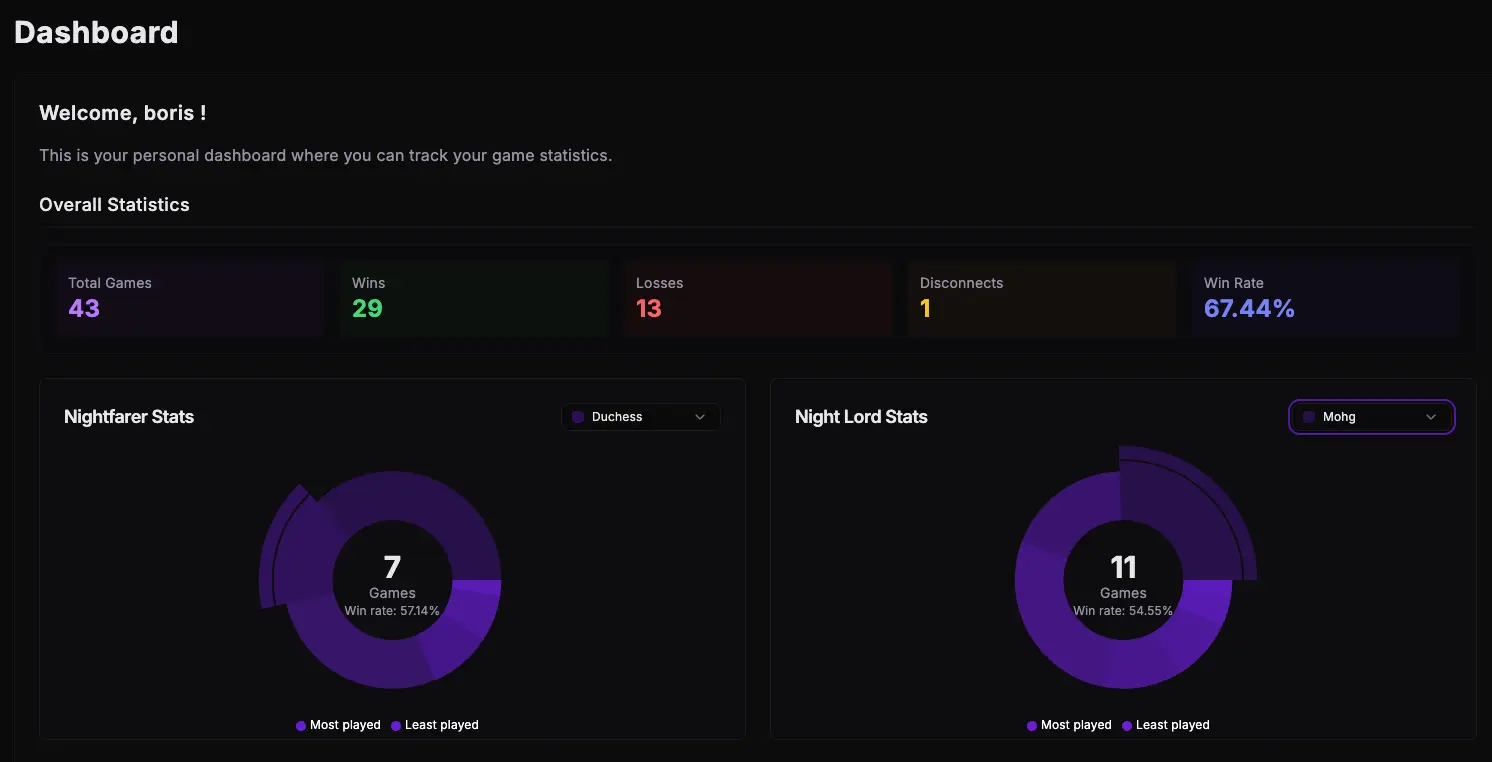
Player dashboard interface (click to enlarge)
Dashboard Overview
Personal Dashboard
Your personal dashboard provides a comprehensive overview of your gaming performance. It's designed to help you track your progress, analyze your strengths, and identify areas for improvement. The dashboard is accessible from the main navigation menu.
Overall Statistics
The top section of your dashboard displays your overall game statistics:
- Total Games - The number of completed sessions you've participated in
- Wins - Your successful sessions
- Losses - Sessions that ended in defeat
- Disconnects - Sessions where you or others experienced technical issues
- Win Rate - Your winning percentage across all games
Character Performance
The dashboard features detailed performance statistics for your characters:
- Nightfarer Stats - Shows performance data for your Nightfarer characters
- Night Lord Stats - Displays your record when playing as Night Lords
- Both sections include games played and win rates with visual indicators
- Drop-down menus allow you to view stats for specific characters
The circular graphs represent your win rates visually, making it easy to identify which characters you perform best with. This information can help you make informed decisions when selecting characters for future sessions.
Session history interface (click to enlarge)
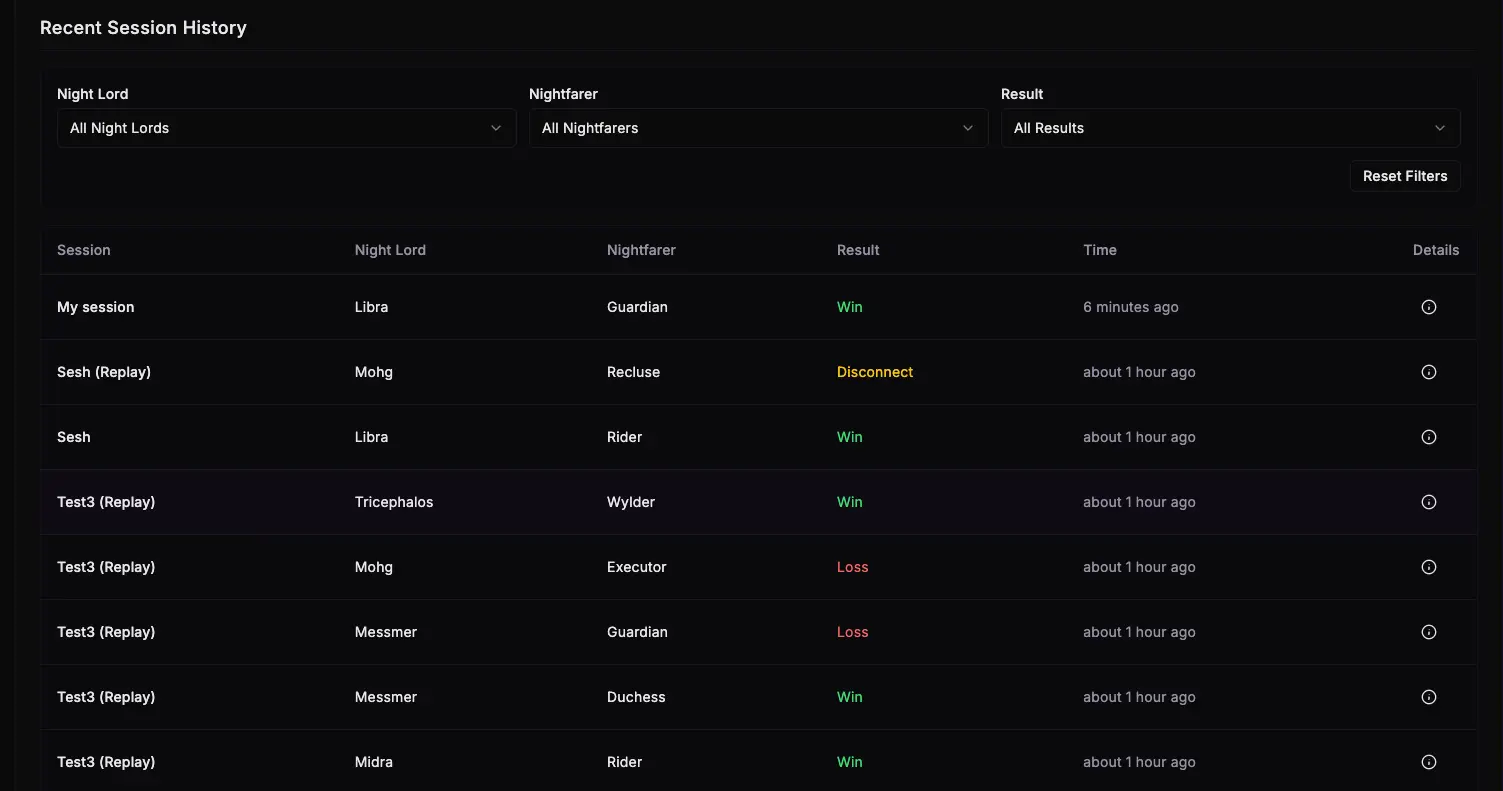
Recent Session History
Session Log
Below your performance statistics, you'll find a detailed log of your recent gaming sessions:
- Each row represents a completed session
- Information includes the session name, Night Lord, Nightfarer, result, and timestamp
- Results are color-coded: Wins in green, Losses in red, Disconnects in yellow
- The time column shows how recently the session took place
Filtering Options
The session history includes powerful filtering capabilities:
- Night Lord Filter - View sessions with specific Night Lords
- Nightfarer Filter - Filter by the Nightfarer used
- Result Filter - Show only wins, losses, or disconnects
- Reset Filters - Clear all filters to view your complete history
These filters help you analyze trends in your gameplay. For example, you might discover that you have a higher win rate against certain Night Lords or when using specific Nightfarer.
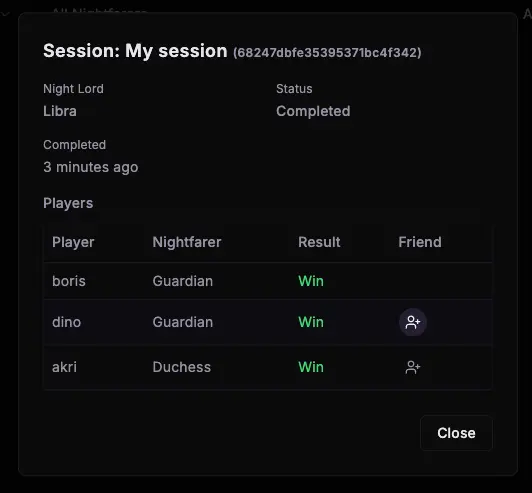
Session details interface (click to enlarge)
Session Details
Reviewing Session Details
Clicking on the details icon for any session reveals a comprehensive overview of that specific game:
- Session ID - The unique identifier for the session
- Night Lord - Which boss your team faced
- Status - Whether the session was completed, canceled, or in progress
- Time - When the session took place
Player Information
The session details window shows information about all players who participated:
- Player usernames
- Each player's chosen Nightfarer
- Individual results (which may differ if players disconnected)
- Friend status indicators for players on your friends list
This detailed view helps you remember who you played with and how the session went. It's also a great way to identify players you might want to add as friends if you haven't already.
Using Session History Effectively
Your session history can be a powerful tool for improvement:
- Identify patterns in your wins and losses
- Track your performance with different Nightfarers
- Find players you've had successful sessions with
- Monitor your progress over time
Regular review of your dashboard can help you make better decisions about Nightfarer selection, team composition, and skill development, ultimately leading to more enjoyable and successful gaming sessions.
Your Sessions
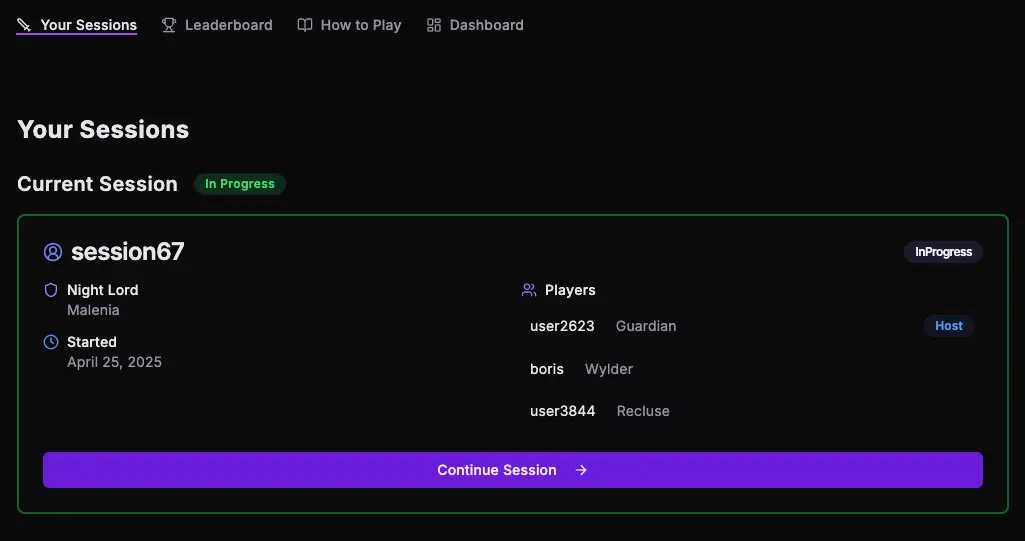
Your Sessions screen (click to enlarge)
Managing Your Active Sessions
Your Sessions Tab
The Your Sessions tab provides a central hub for tracking your game sessions:
- Always accessible from the main navigation bar at the top of the screen
- Displays your current active session with its status (In Progress, Waiting, etc.)
- Shows key session information including the Night Lord and start time
- Lists all players in your session with their chosen Nightfarer characters
- Identifies the host of the session with a special indicator
This screen serves as your home base for ongoing sessions, allowing you to quickly resume gameplay without having to search for your session again.
Returning to Your Active Session
If you navigate away from your session, you can easily return to it:
- Click on the "Your Sessions" tab in the main navigation
- Your active session will be displayed prominently at the top
- Click the "Continue Session" button to immediately return to your active session
- All session details and chat history will be preserved exactly as you left them
This feature allows you to check other parts of the application without losing track of your ongoing session.
Session Limitations
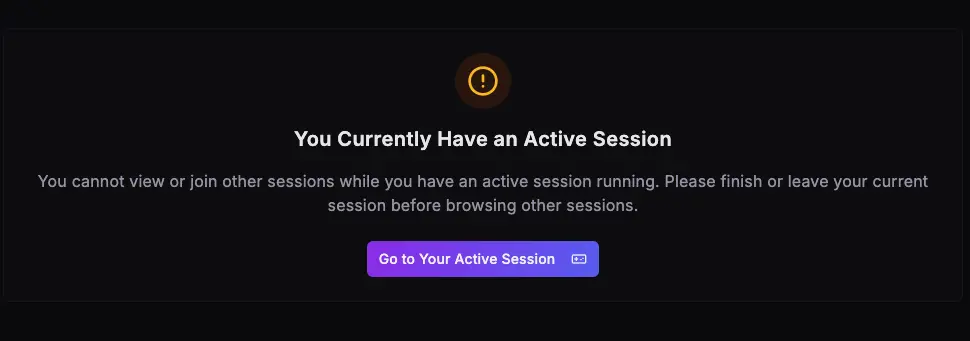
Active session restriction notice (click to enlarge)
Understanding Session Restrictions
One Active Session Limit
Covenant Match has an important limitation to ensure fair play and system stability:
- You can only join or create one session at a time
- If you attempt to join another session while one is active, you'll see a notification
- This restriction applies whether you're the host or a participant
- The system prevents you from browsing other sessions while in an active one
This limitation ensures that players remain committed to their current session and prevents them from joining multiple sessions simultaneously, which could lead to abandoned sessions.
How to Join a New Session
Before you can join a different session, you must first:
- If you are the host, you can cancel your current session before joining a new one (it needs to be before the session starts)
- If you are a participant, you can leave your current session by clicking the "Leave Session" button (if available)
- Wait for your current session to be completed or canceled
Once you've properly exited your current session, you'll be able to browse and join other available sessions again.
Rejoining Your Active Session
If you encounter the "You Currently Have an Active Session" notification:
- Click the "Go to Your Active Session" button to return to your current session
- You'll be redirected back to your session screen
- This helps prevent accidental navigation away from active sessions
This system ensures that you never lose track of your active session and helps maintain a positive experience for all players by preventing abandoned sessions.
Why This Limitation Exists
The one-session limit provides several important benefits:
- Improved Session Quality - Ensures all players are fully engaged in their current session
- Reduced Abandonments - Prevents players from leaving sessions without proper conclusion
- System Stability - Helps maintain smooth performance by limiting simultaneous connections
- Fair Play - Creates a level playing field where everyone follows the same rules
While this limitation may occasionally require you to wait before joining a new session, it significantly improves the overall experience for the entire community by promoting commitment and responsible participation.